June 16, 2015

Windows Server 2008 R2 - Please shutdown this system and reboot into Directory Services Restore Mode

Error message :


Error status: 0x0000001. please shutdown this system and reboot into directory services restore mode

The server bluescreens, reboots into safe mode and repeats the cycle

Solution

The solution that worked was found on technet forums

1.  Restart the server and press F8 key, select Directory Services restore mode.
2.  Log in with the local administrator username and password
3.  Type cd \windows\system32
4.  type NTDSUTIL
5.  type activate instance NTDS
6.  type files
7.  If you encounter an error stating that the Jet engine could not be initialized exit out of ntdsutil.
8.  type cd\
9.  type md backupad
10. type cd \windows\ntds
11. type copy ntds.dit c:\backupad
12. type cd \windows\system32
13. type esentutl /g c:\windows\ntds\ntds.dit
14. This will perform an integrity check, (the results indicate that the jet database is corrupt)
15. Type esentutl /p   c:\windows\ntds\ntds.dit
16. Agree with the prompt
17. type cd \windows\ntds
18. type move *.log c:\backupad   (or just delete the log files)
This should complete the repair.  To verify that the repair has worked successfully:
1.  type cd \windows\system32
2.  type ntdsutil
3.  type activate instance ntds
3.  type files        (you should no longer get an error when you do this)
4.  type info       (file info should now appear correctly) 
One final step, now sure if it's required:
From the NTDSUTIL command prompt:
1.  type Semantic Database Analysis
2.  type Go

The addition is the error fix as described on Microsoft support article
3. ntdsutil "sem d a" "go f"

May 15, 2015

Manually delete linked clones or stale virtual desktops in VMware Horizon View

Here are some errors that get thrown out:

Failed to remove VM <VM path> from the View Composer inventory - null

Desktop Composer Fault: Virtual Machine with Input Specification already exists

Pool or Desktop stuck showing "Deleting (missing)"


  • Log on to the View composer server.
  • Open an elevated command prompt and navigate to "C:\Program Files (x86)\VMware\VMware View Composer".
  • Run this command: sviconfig -operation=RemoveSviClone -VmName=<Virtual Machine Name> -AdminUser=<username> -AdminPassword=<password> -ServerUrl=https://localhost:18443/SviService/v2_0. 
  • ComposerCommand
  • If it does not run successfully, you'll have to manually delete the VM from the ADAM database. See KB articles


Links and references


VMware KB: 2015112
VMware KB: 2009844

http://michkloc.com/failed-to-remove-vm-vm-path-from-the-view-composer-inventory-null/

http://www.vladan.fr/delete-orphaned-horizon-view-replica/

http://vcdx56.com/2013/10/23/can-not-delete-desktop-pool-in-vmware-horizon-view/

April 30, 2015

Disable IPv4 autoconfiguration for 169.254 duplicate addresses

Quick description

  • static IPs configured on various Windows servers running under VMware
  • after reboot they show both the static configured IP as well as a 169.254.10.50 (example)
  • the invalid IP shows as "prefered"

Fix

  • disable autoconfiguration
    • netsh interface ipv4 show inter
    • netsh interface ipv4 set interface 11 dadtransmits=0 store=persistent
  • disable DHCP client service
  • reboot


March 27, 2015

Quickly recover VMware orphaned virtual machines

After the ESXi OS crashed, it was quickly reinstalled to a fresh USB.

Once 'reconnected' in vCenter the existing datastore was recognized automatically however few things were missing:
- networking settings
- firewall rules
- auto-start for any VMs
- all VMs showed as 'orphaned'

Quick way to restore the VMs :
- enable SSH
- find your volume for the datastore in /vmfs/volumes
- run these line

# find /vmfs/volumes/53456cd6-ee79d800-ad57-002590e2fde0/ -name "*.vmx" | sed
's/\(.*\)/vim-cmd solo\/registervm "\1"/' > /restorevmx

# sh /restorevmx
# rm /restorevmx

What it does is search for all .vmx files in the datastore and runs the 'vim-cmd solo/registervm' command. 
Running it on existing VMs that are not 'orphaned' will just cause the tool to skip them

The best part is that the VMs don't have to be removed from inventory to be re-added

There doesn't seem to be any downsides as long as you don't remove them in vCenter.

References: VMware KB 1006160

February 10, 2015

automating winhelp2002 MVP HOSTS file to pfSense 2.2

Intro

looking to implement - "...HOSTS file to block ads, banners, 3rd party Cookies, 3rd party page counters, web bugs, and even most hijackers."


pfSense uses dnsmasq and we need to convert entries from HOSTS file to the dnsmasq format

0.0.0.0 static.a-ads.com -> address=/static.a-ads.com/127.0.0.1

We will have it scheduled to run daily at midnight to keep the list up to date

note: On pfSense 2.2, The DNS Forwarder is not active by default. It has been replaced by Unbound as a DNS Resolver. It may still be used, and is still active on upgraded configurations. To use the DNS Forwarder (dnsmasq) on 2.2, first disable Unbound and then enable the DNS Forwarder.Dec 26, 2014
DNS Forwarder - PFSenseDocs
https://doc.pfsense.org/index.php/DNS_Forwarder

Therefore this applies only if you're using dnsmasq

Preparation

install package cron 0.1.8

create folder in ssh 
  # mkdir /usr/local/etc/dnsmasq.d/

go to pfSense: 
Services -> DNS Forwarded
  enable advanced button and enter: 
  conf-dir=/usr/local/etc/dnsmasq.d


Command

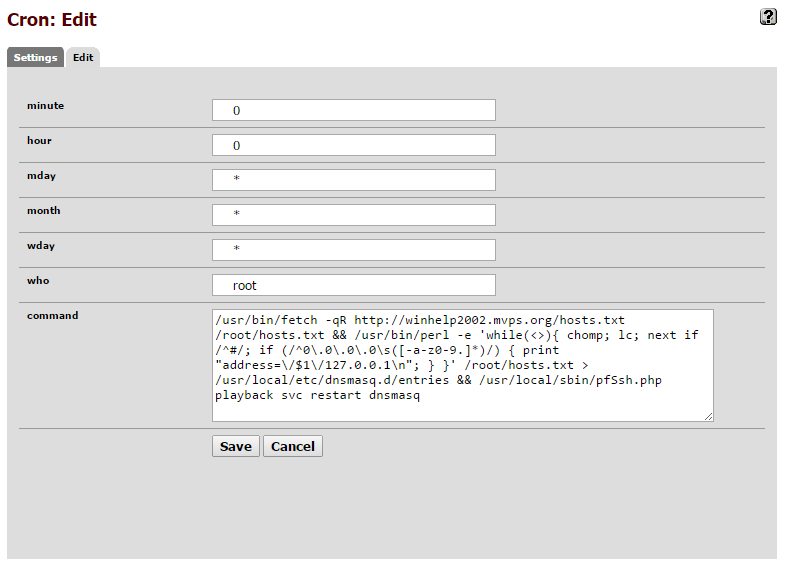
fetch -qR http://winhelp2002.mvps.org/hosts.txt /root/hosts.txt && perl -e 'while(<>){ chomp; lc; next if /^#/; if (/^0\.0\.0\.0\s([-a-z0-9.]*)/) { print "address=\/$1\/127.0.0.1\n"; } }' /root/hosts.txt > /usr/local/etc/dnsmasq.d/entries && pfSsh.php playback svc restart dnsmasq

broken down and explained

fetch -qR http://winhelp2002.mvps.org/hosts.txt /root/hosts.txt 
&& 

# -q, --quiet
Quiet mode.
# -R, --keep-output
The output files are precious, and should not be deleted
under any circumstances, even if the transfer failed or was
incomplete.

# saves to /root/hosts.txt
---------------------------------------------------------------------------

perl -e '
  while(<>) {    # for every line in input file (specified as argument below)

    chomp;         # remove newlines

    lc;                 # lowercase all characters

    next if /^#/;  # skip if it matches character '#' at the begining - comments

    if (/^0\.0\.0\.0\s([-a-z0-9.]*)/)     
        # if it matches this 0.0.0.0(space)(url - can only contain a-z0-9 and a dash)
        # example 0.0.0.0 static.a-ads.com

    { 
       print "address=\/$1\/127.0.0.1\n"; 
        # print what we matched $1 and the rest of the text so it looks like: 
        #   address=/static.a-ads.com/127.0.0.1

     } 
  }' 

/root/hosts.txt                                          # our input file
> /usr/local/etc/dnsmasq.d/entries          # save to this file
&& 
---------------------------------------------------------------------------

pfSsh.php playback svc restart dnsmasq   # restart dnsmasq service to reload file


Application


test the line by running it in the SSH - check the output of
/root/hosts.txt
/usr/local/etc/dnsmasq.d/entries


when everything runs and you have the 'entries' file populated correctly, schedule it to run daily 

Schedule


After you install the package, go to pfSense: 
Services -> Cron
Pay attention to add full paths


June 13, 2014

Migrate VMware vCenter from ESXi to Microsoft Hyper-V 2012 R2

Because vCenter was running on the ESXi that was supposed to be updated by the vCenter itself, it had to be moved elsewhere first.

To migrate to Hyper-V use the Microsoft tool
Microsoft Virtual Machine Converter 2.0 at
http://www.microsoft.com/en-us/download/details.aspx?id=42497

Check the manual, there are some caveats.
Installed on the Hyper-V server and shared the 'Disks' folder on the Hyper-V server to administrators. This share is required by the converter tool.

Shut down the vCenter machine and point the converter to the ESXi itself.
Use the shared drive above as the destination and a temp folder as the conversion working folder.


After conversion completes:
  • uninstall the VMware tools and install the Microsoft Integration Services
  • change the settings on the NIC as there's a completely new one installed. Uncheck IPV6
  • update any DHCP lease reservations with the new MAC address if needed
  • to keep the old VM from interfering, disconnect the NIC for the VM by unchecking the 'connected' box in ESX

The migrated vCenter machine had some issues and was unable to start the vpxd service
There was an error something to the effect of "unable to create sso facade" in the log file at
  %ProgramData%\VMware\VMware VirtualCenter\Logs\vpxd.log

Two possible fixes 

  • Check your hosts file and make sure when you ping the FQDN you get IPV4 responses only.
  • Run the fix on the second article 
start -> run -> cmd
set JAVA_HOME=C:\Program Files\VMware\Infrastructure\jre
cd "C:\Program Files\VMware\Infrastructure\SSOServer\Utils
rsautil manage-secrets -a recover -m <masterPassword>

Try to manually start service or reboot


January 19, 2014

VMware vCenter: A general system error occurred: Authorize Exception

Intro 

Trying to log in to ESXi and vCenter 5.1, getting error 'Authorize Exception'. These are the troubleshooting steps taken to resolve.
There was a specific cause tied to a scenario and there are solution steps taken to remedy.


Troubleshooting

Luckily there is a KB article that shows up when you search for the error text on a search engine. We'll start with that as a guide

vCenter Server login fails with the error: A general system error occurred: Authorize Exception (1015639)

VMware advises to check these 3 things

  1. SSO identity source not configured correctly
  2. vCenter Server disconnected from Active Directory
  3. DNS resolution


In order of difficulty, start from the bottom.


3. DNS resolution

To verify that the DNS is working, on the vCenter window server, do one or all of these

  • check the ipconfig/all from the command line and verify the DNS servers listed are correct
  • open cmd, type nslookup, and try to resolve the hostname and FQDN of your vCenter server


2. vCenter Server AD connectivity

To verify, RDP to vCenter and open the user groups in Windows Server, then review the Administrators group. 

If you are seeing the Security IDs instead of DOMAIN\USER, the AD connectivity is lost and you may have to rejoin the AD. 
The KB article above has some more details before you just re-add blindly.


1. SSO identity source

Here's the guide on how to configure the SSO


To verify this configuration we are going to go backwards
  • Navigate to vCenter web Client
  • https://vcenter.corp.potato.com:9443/vsphere-client/ 
  • login using the following
    • username: admin@System-Domain
    • password:  set up during vCenter installation. If you used Simple install, the password may be blank (?)
  • Go to Administration -> Sign-On and Discovery, Configuration
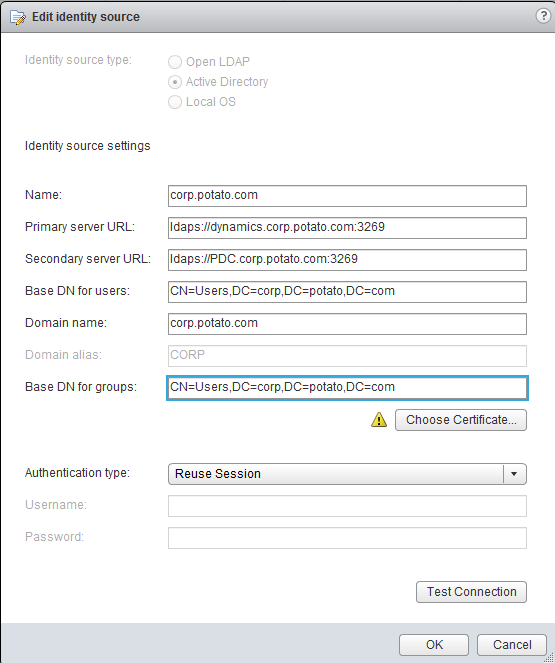
  • under Identity Sources, click on the ldaps entry and then the little pencil icon to edit it.
  • Verify your settings and check the Primary server URL first
  • Note the button 'Choose Certificate' does not show up until you type something in any box
  • You can test the connection but the fail message is non-descript here.


Check Certificate 


There are different ways about this, but you want to verify the machine certificate of the 'Primary server URL'. This is needed for secure LDAP to work.
  • RDP to the windows machine (dynamics.corp.potato.com). Start -> run -> mmc -> add remove snap-in -> Certificates -> Add -> Computer account -> Local -> finish
  • Expand Certificates -> Personal -> Certificates
  • find the matching cert and verify
    • Valid from: check this date is correct!
    • Issued to: dynamics.corp.potato.com
    • Issued by: your AD cert authority 
    • Intent: "Proves your identity to a remote computer" AND "Ensures the identity of a remote computer"
    • Certificate Template Name : "DomainController"
    • Enhanced Key Usage: "Client Authentication (1.3.6.1.5.5.7.3.2)" AND "Server Authentication (1.3.6.1.5.5.7.3.1)"

Check LDAPS is working

  • connect to any domain controller that works and go start -> run -> ldp
  • Connection -> connect -> enter the FQDN of the 'primary server' (dynamics.corp.potato.com)
  • use port 636 and check 'SSL'
  • if it's failing you will get an error that you can look up, hopefully. In this case it was 
0x0 = ldap_unbind(ld);
ld = ldap_sslinit("dynamics", 389, 1);
Error 0 = ldap_set_option(hLdap, LDAP_OPT_PROTOCOL_VERSION, 3);
Error 81 = ldap_connect(hLdap, NULL);
Server error: <empty>
Error <0x51>: Fail to connect to dynamics.
ld = ldap_sslinit("dynamics", 6389, 1);
Error 81 = ldap_set_option(hLdap, LDAP_OPT_PROTOCOL_VERSION, 3);
Error 81 = ldap_connect(hLdap, NULL);
Server error: <empty>
Error <0x51>: Fail to connect to dynamics.

  • If it's successful you will get something like this
ld = ldap_sslinit("dynamics", 636, 1);
Error 0 = ldap_set_option(hLdap, LDAP_OPT_PROTOCOL_VERSION, 3);
Error 0 = ldap_connect(hLdap, NULL);
Error 0 = ldap_get_option(hLdap,LDAP_OPT_SSL,(void*)&lv);
Host supports SSL, SSL cipher strength = 128 bits
Established connection to dynamics.
Retrieving base DSA information...
Getting 1 entries:
Dn: (RootDSE)
configurationNamingContext: CN=Configuration,DC=corp,DC=potato,DC=com;
          [many lines]
....... 

Cause

In this case, the following scenario happened:

  • A domain controller was removed from the forest. 
  • This DC by chance was also the Cert Authority. 
  • The replacement DC was not made a CA
  • There was no CA on the domain, and all the existing machine issued certs were valid for a year
  • After a year has passed since the [automatic] issuing of the certs, the LDAPS ceased to function since the certs were past their expiry date.
  • The clue was that during the cert check of 'dynamics' the machine cert was showing as expired and LDP tool was failing to connect as well


Solution

Issue new cert to the 'Primary server' (dynamics)

  • A Cert Authority was installed in the domain forest. 'New CA' was added since old private keys were lost
  • CA automatically propagated on the domain and issued new machine certs to all the existing DCs and signed with the new CA as 'issued by'. 
  • Reboot of the 'dynamics' server was performed here.
  • at this point verified LDAPS with LDP tool connecting to 'dynamics' successfully 

Export the cert from 'Primary server' (dynamics)

  • Connect to the 'Primary server' (dynamics) 
  • Start -> run -> mmc -> add remove snap-in -> Certificates -> Add -> Computer account -> Local -> finish
  • Expand Certificates -> Personal -> Certificates
  • Find the matching cert by the FQDN -> properties
  • Details tab -> Copy to File -> Next -> No, do not export the private key -> Base-64 encoded X.509 (.CER)
  • Save this file to a common location

Import the new cert to vCenter server 

This next bit may not be the formal way to fix, but it worked since all the config in place was valid and only the cert was needed
  • Navigate to vCenter web Client as instructed above
  • https://vcenter.corp.potato.com:9443/vsphere-client/ 
  • .... like above and refer to the picture....
  • Add any text in either 'Primary' or 'Secondary server URL' and undo it. This will cause the button 'Choose Certificate' to appear, but keep all the existing values as they were. 
  • Click the 'Choose Certificate' and navigate to the .CER file you exported above
  • The successful message is 'Certificate added' / 'The selected certificate has been successfully added to the vCenter Single Sign On keystore.'
  • You can test the connection now as well, 
    • since we're logged in as admin@System-Domain change to 'Password' 
    • use any domain user/pw that is authorized
    • 'The connection has been established successfully.'
  • Click OK to save

Logging in to vCenter using the vSphere client worked at this point without any more reboots.